Custom actions and scripts

Overview

Not every website is the same. That is why we want to give you the ability to extend Front Matter and you can do this by adding your custom actions to the Front Matter panel. A custom action is nothing more than a Node.js script which is referenced from within your project.
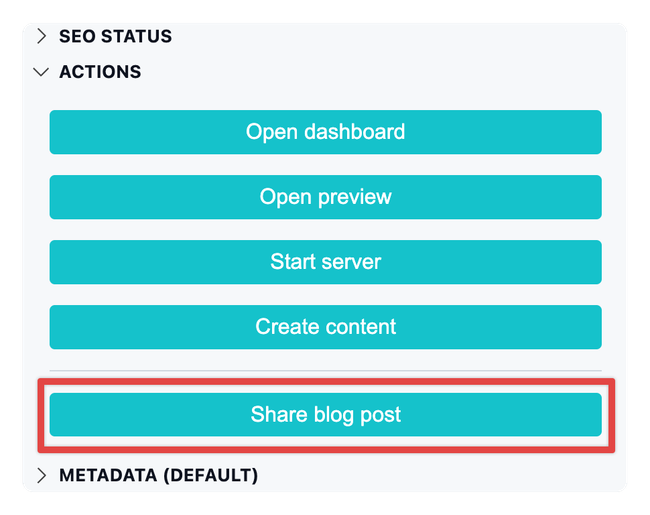
Custom action

Sample: Generate open graph preview image in Code with Front Matter

Important: You can add custom actions for your content and media files.

The custom action setting

The content and media custom actions can be defined by using the frontMatter.custom.scripts setting.

Custom actions can be configured with the following properties:

TitleTypeDescriptionDefault
idstringThe id of the custom action/script""
titlestringThe title of the custom action""
scriptstringThe path to the script to execute""
commandstringThe command to execute (optional). Example: node, path to your node executable, bash, python, ...node
type<content | mediaFile | mediaFolder>The type for which the script will be used (optional).

Use one of the following types: content, mediaFile, or mediaFolder.
content
bulkbooleanRun the script for one file or multiple files.false
output<notification | editorSpecifies the output type (optional).

Available values are: notification and editor.

notification: The output will be passed as a notification.
editor: The output will be passed to the editor.
notification
outputType<text | html>Specifies the output type (optional).

Available values the editor values from VS Code like:

text: The output will be passed as a text file.
html: The output will be passed as an HTML file.
markdown: The output will be passed as a Markdown file.
text
hiddenbooleanHide the action from the UI. This is mostly used when creating a content script that will be used to post process new content (optional).false
environmentsenvironmentThe environments option allows you to specify in which environments the script should be executed (optional).

Available values are: macos, linux, or windows.
undefined
contentTypesstring[]The content types for which the script will be used (optional).

Example: ["post"]
undefined

Important: Previously, you could define the nodeBin property to define the path to your node executable. This path was needed when you are working with for instance nvm and have multiple versions of node installed. You can now use the command property instead.

Environment type

The environment option contains the following properties:

TitleTypeDescriptionDefault
type<macos | linux | windows>The environment type for the script to run at.""
scriptstringThe path to the script to execute.""
commandstringThe command to execute (optional). Example: node, path to your node executable, bash, python, ...node

Example of defining a custom action with an environment

{
  "frontMatter.custom.scripts": [
    {
      "title": "Create image folder",
      "id": "create-image-folder",
      "script": "./.frontmatter/config/custom/scripts/create-image-folder.sh",
      "command": "bash",
      "environments": [
        {
          "type": "windows",
          "script": "./.frontmatter/config/custom/scripts/create-image-folder.ps1",
          "command": "powershell"
        }
      ]
    }
  ]
}

Info: The above sample would execute the bash script on macOS and Linux and the PowerShell for Windows. In case the PowerShell script would fail, it would fallback to the bash script.

Creating a content script

Create a folder in your project where you want to store all your custom scripts, and create a new JavaScript file.

Info: You can also use another language like Python, Bash, ... for your script. Examples are provided at the end of this page.

Installing the extensibility package (optional)

When using JavaScript, you can make use of the @frontmatter/extensibility package.

npm i @frontmatter/extensibility

With this @frontmatter/extensibility dependency, you can easily get the arguments and ask questions to the user.

Creating a script without the extensibility package

When you do not want to use the @frontmatter/extensibility package, you can create a script as follows:

const args = process.argv;

if (args && args.length > 0) {
  const workspaceArg = args[2]; // The workspace path
  const fileArg = args[3]; // The file path
  const frontMatterArg = args[4]; // Front matter data

  console.log(`The content returned for your notification.`);
}

The current workspace-, file-path, and front matter data will be passed as a arguments. Like you can see in the above sample script, you can fetch these argument values as follows:

  • args[2]: The workspace path
  • args[3]: The file path (Markdown file)
  • args[4]: The front matter data as object

Creating a script with the extensibility package

When you want to use the @frontmatter/extensibility package, you can create a script as follows:

import { ContentScript } from "@frontmatter/extensibility";

const { workspacePath, filePath, frontMatter, answers } = ContentScript.getArguments();

ContentScript.done("The content returned for your notification.");

Configure the script

To use this functionality, you will need to configure the frontMatter.custom.scripts setting for your project as follows:

{
  "frontMatter.custom.scripts": [
    {
      "title": "Generate social image",
      "script": "./scripts/social-img.mjs",
      "command": "~/.nvm/versions/node/v18.17.1/bin/node"
    }
  ]
}

Important: When the command execution would fail when it cannot find the node command. You are able to specify your path to the node app. Command execution might for instance fail when using nvm. You can use the command property to specify the path to your node executable (this is optional).

Once a custom action has been configured, it will appear on the Front Matter panel. The output of the script will be passed as a notification in VS Code. This output allows you to copy the output, useful when you generate additional content.

Custom action output

Updating the front matter of your content

By default, once a custom action executed, it will show the output in a notification. In case you want to update the front matter of your content, you need to provide the data in the following JSON format.

{ "frontmatter": { "<field name>": "field value" } }

Example when you want to update the title without the @frontmatter/extensibility dependency:

Update without the extensibility dependency
(async () => {
    // Your script logic

    // Finally, update the front matter of your content by passing the data
    // in the following format
    const output = JSON.stringify({
      frontmatter: {
        title: "My new title"
      }
    });

    console.log(output);
  }
})();

Example when you want to update the title with the @frontmatter/extensibility dependency:

Update with the extensibility dependency
import { ContentScript } from "@frontmatter/extensibility";

ContentScript.updateFrontMatter({ title: "My new title" })

When data is passed in the above format, it will automatically get parse the JSON data and the file its front matter gets updated accordingly.

Bulk script execution

If you want, you can run a script for multiple files at once. This is useful when you want to generate a social image for all your markdown files or perform any other bulk operation.

To enable bulk script execution, you need to configure the frontMatter.custom.scripts setting for your project as follows:

{
  "frontMatter.custom.scripts": [
    {
      "title": "Generate social image",
      "script": "./scripts/social-img.js",
      "command": "~/.nvm/versions/node/v16.13.0/bin/node",
      "bulk": true,
      "output": "editor"
    }
  ]
}

Important: The bulk property is what specifies if it is a script that should be executed for multiple files.

Creating a media script

Creating a media script is similar to creating a content script. The only difference is that you need to specify the type property. You can use the mediaFile or mediaFolder as the value for the type property.

Like the name suggests, the mediaFile type will be used for scripts that should be executed for a single media file. The mediaFolder type will be used for scripts that should be executed for all media files in a folder.

Here is a sample on how you can define a media script:

{
  "frontMatter.custom.scripts": [
    {
      "title": "Optimize media",
      "script": "./scripts/media.js",
      "command": "~/.nvm/versions/node/v16.13.0/bin/node",
      "type": "mediaFile"
    },
    {
      "title": "Optimize images",
      "script": "./scripts/media-all.js",
      "command": "~/.nvm/versions/node/v16.13.0/bin/node",
      "type": "mediaFolder"
    }
  ]
}

The script will provide you the following arguments:

  • args[2]: The workspace path
  • args[3]: The file or folder path. This depends on the type of script.

When using the @frontmatter/extensibility package, you can get the arguments as follows:

import { MediaScript } from "@frontmatter/extensibility";

const { workspacePath, mediaPath, answers } = MediaScript.getArguments();

Media file script

When you defined a media file script, you will be able to execute it for a single media file from its menu.

Custom action for a media file

Media folder script

When you defined a media folder script, you will be able to execute it for all media files in the menu next to the create new folder button.

Custom action for a media folder

Asking questions to users

When you want to ask questions to the user, you can use the askQuestions function from the @frontmatter/extensibility package. This functionality can be used in both content and media scripts.

To get started, you need to know that you have to check if the answers property is available in the arguments. If it is not available, you can ask the questions to the user. Once the user has answered the questions, the answers will be passed to the script.

Here is a sample on how you can ask questions to the user:

Sample script with questions to the user
import { MediaScript } from '@frontmatter/extensibility';
import { Image } from 'image-js';

(async () => {
  const mediaScriptArgs = MediaScript.getArguments();

  if (!mediaScriptArgs) {
    MediaScript.done(`No arguments found`);
    return;
  }
  
  const imagePath = mediaScriptArgs.mediaPath;
  const answers = mediaScriptArgs.answers;

  let image = await Image.load(imagePath);

  if (!answers) {
    MediaScript.askQuestions([{
      name: "width",
      message: "What is the width of the image?",
      default: image.width
    }]);
    return;
  }

  const width = answers.width;

  if (!width) {
    MediaScript.done(`No width provided`);
    return;
  }

  await image.resize({ width: parseInt(width) }).save(imagePath);

  MediaScript.done(`Image resized to ${width}px`);
})();

How the above script works:

  1. It will check if the answers property is available in the arguments. If it is not available, we create a new question for the user and return the script without any output.
  2. Once the user has answered the question, the script will be executed again, but this time the answers property will be available in the arguments.
  3. We will fetch the width from the answers and resize the image accordingly.

Open a file or webpage from a custom script

If you want to open a file or webpage from a custom script, you can use the ContentScript.open function from the @frontmatter/extensibility package.

Here is a sample on how you can open a file or webpage from a custom script:

Sample script where at the end a webpage is opened
import { ContentScript } from '@frontmatter/extensibility';

(() => {
  const contentScriptArgs = ContentScript.getArguments();
  if (contentScriptArgs) {
    const { frontMatter: { title, slug }, answers } = contentScriptArgs;

    if (!answers) {
      ContentScript.askQuestions([{
        name: "platform",
        message: "Where do you want to share the article?",
        options: ["Twitter", "LinkedIn"]
      }]);
      return;
    }

    const platform = answers.platform;
    if (!platform) {
      ContentScript.done(`No platform provided`);
      return;
    }

    const url = `https://www.eliostruyf.com${slug.startsWith("/") ? slug : `/${slug}`}`;
    let shareUrl = "";
    if (platform === "Twitter") {
      shareUrl = `http://twitter.com/share?text=${encodeURIComponent(title)}&url=${encodeURIComponent(url)}`;
    } else if (platform === "LinkedIn") {
      shareUrl = `https://www.linkedin.com/shareArticle?mini=true&url=${encodeURIComponent(url)}`;
    }

    ContentScript.open(shareUrl);
  }
})();

Sample scripts

Bash starter

echo "workspaceArg: $1"
echo "fileArg: $2"
echo "frontMatterArg: $3"

Python starter

#!/usr/bin/python3

import sys

print(f'workspaceArg: {sys.argv[1]}')
print(f'fileArg: {sys.argv[2]}')
print(f'frontMatterArg: {sys.argv[3]}')

Optimize image (media file script)

const path = require("path");

const args = process.argv;

(async () => {
  if (args && args.length > 0) {
    const imagemin = (await import("imagemin")).default;
    const imageminJpegtran = (await import("imagemin-jpegtran")).default;
    const imageminPngquant = (await import("imagemin-pngquant")).default;

    const fileArg = args[3]; // The file path

    await imagemin([fileArg], {
      destination: path.dirname(fileArg),
      glob: false,
      plugins: [imageminJpegtran(), imageminPngquant()],
    });

    console.log(`Optimized image ${path.basename(fileArg)}`);
  }
})();

Prerequisites:

  • npm i imagemin imagemin-jpegtran imagemin-pngquant

Optimize images in the current folder (media folder script)

const path = require("path");

const args = process.argv;

(async () => {
  if (args && args.length > 0) {
    const imagemin = (await import("imagemin")).default;
    const imageminJpegtran = (await import("imagemin-jpegtran")).default;
    const imageminPngquant = (await import("imagemin-pngquant")).default;

    const workspaceArg = args[2]; // The workspace path
    const folderArg = args[3]; // The folder path

    const files = await imagemin([path.join(folderArg, "*.{jpg,png}")], {
      destination: folderArg,
      glob: true,
      plugins: [imageminJpegtran(), imageminPngquant()],
    });

    console.log(`Optimized images: ${files.length}`);
  }
})();

Prerequisites:

  • npm i imagemin imagemin-jpegtran imagemin-pngquant

Feedback/comments

Last updated on

Did you spot an issue in our documentation, or want to contribute? Edit this page on Github!

Ready to get started?

Special thanks to our backers & sponsors

run.events - Event Management PlatformVercelBEJS Community